


Sway Bar
YZS manufactures forged sway bars (anti-roll bars / stabilizer bars) in solid spring steel (60Si2MnA, 50CrVA) and hollow tube (35CrMo, 42MnB, 34MnB5, 51CrV4, 4340). IATF 16949 certified, 100,000 units/month. CNC-bent to ±0.1mm tolerance.
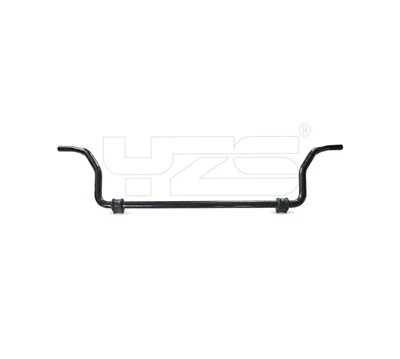
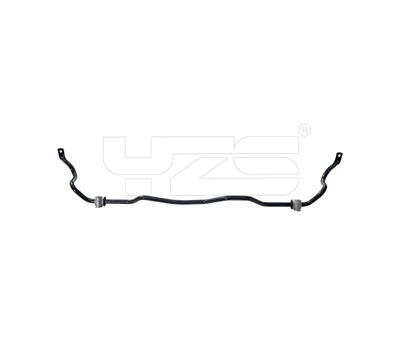


What Is Sway Bar?
A sway bar is part of your vehicle’s suspension, which includes your wheels / tires, springs, shocks, steering system, linkages, bushings, and joints. Sway bars help your ride handle turns and prevent body lean, the last thing you want while operating a motor coach or RV!
At its core, a sway bar is really just a torsion spring - a piece of metal that reacts to a twisting movement. When your vehicle turns, the sway bar works to level everything out and fights that tilting feeling you may have experienced when taking a corner too fast. The number and variety of sway bars depends on the vehicle, and the actual bar attaches across the vehicle’s body from one wheel to the other.
Solid Sway Bars: These are the most basic type of sway bar and are typically made from solid steel. They are durable and inexpensive to manufacture, but they can be heavy and may transmit more noise and vibration to the vehicle's cabin.
Hollow Sway Bars: These are similar to solid sway bars but hollowed out in the center to reduce weight. They offer a good balance of strength and weight but can be more expensive to manufacture than solid sway bars.
Adjustable Sway Bars: These have a mechanism that allows the stiffness of the torsion spring to be adjusted. This allows the driver to fine-tune the sway bar for different driving conditions and styles. Adjustable sway bars are more expensive than solid or hollow, but they offer the most flexibility and performance.
Tubular Sway Bars: These are similar to hollow sway bars, but they are made from a tube of steel or aluminum. They are lightweight and robust but can be more expensive than other types of sway bars.
Split Sway Bars: These sway bars are similar to solid sway bars, but they have a split in the middle. This allows the sway bar to be installed without removing the entire suspension system. They are less common than other types of sway bars.

Sway bars, also called stabilizer bars, are used to keep your vehicle from rolling over. It is a U-shaped steel bar that is connected to each of the vehicle’s front wheels. When your vehicle goes around a turn, your vehicle’s body rolls to one side, or its weight shifts to one side. When this happens, your vehicle is experiencing “body roll” or “sway.” The sway bar will control each wheel’s suspension to even out your vehicle’s body roll and keep your vehicle more level and in control. Again, when you are going around a turn, your vehicle’s body will roll or sway to the outside of the turn. This means that the weight of your vehicle is transferred more to the outside wheels, and the suspension on your outside wheels compress. The two wheels on the inside of the turn will rise, or the suspension will extend. Just think, when you are taking a sharp turn, you can actually feel your body moving or drifting to the outside of the turn. The next time you are going around a turn, think about how you can feel your body swaying and imagine that your vehicle is experiencing the same thing. The sway bar is in charge of controlling this body roll. The sway bar will push the tires on the inside of the turn down or compress the inside wheel’s suspension, so they stay in contact with the road to control your vehicle’s stability. The sway bar will distribute your vehicle’s weight over all four tires to keep your vehicle as flat as possible through a turn.
Main functions of Sway Bar
Anti-roll bars provide two main functions. The first is to reduce body lean. This is dependent on the total roll stiffness of the vehicle. Increasing this stiffness does not change the steady state total load (weight) transfer from the inside wheels to the outside, it only reduces body lean. The total lateral load transfer is determined by the center of gravity height and track width.
The other function of anti-roll bars is to tune the handling balance of a car. Understeer or oversteer can be reduced by changing the proportion of the total roll stiffness that comes from the front and rear axles. Increasing it at the front increases the proportion of the total load transfer that the front axle reacts to - and decreases it in the rear. In general, this makes the outer front wheel run at a comparatively higher slip angle, and the outer rear wheel to run at a comparatively lower slip angle, increasing understeer. Increasing the proportion of roll stiffness at the rear axle has the opposite effect, decreasing understeer.
The manufacturing process for sway bars typically begins with the selection of the appropriate material for the bar. Common materials include steel, aluminum, and carbon fiber, each of which has its own unique properties and benefits.
Next, the Sway Bar is shaped and sized to fit the specific vehicle it will be used on. This may involve bending the bar to match the shape of the suspension, or machining it to a specific diameter.
The sway bar is then finished by applying a coating, such as paint or powder coat, to protect it from corrosion and wear. It is then assembled with the necessary mounting brackets and links, and tested to ensure that it meets the required specifications.
Overall, the manufacturing process for sway bars involves a combination of fabrication, machining, and assembly, and it is typically carried out by specialized manufacturers using specialized equipment.
What Size Sway Bar Do I Need?
First choose which shaft size (28 spline or 35 spline) you require. As a pointer 28 spline (1.2”, 30.48mm) are used in most trail rigs, smaller race cars and in the front of bigger race cars as well. 35 spline (1.5”, 38.1mm) shafts tend to be used in bigger, heavier cars particularly for rear end applications.
'Bar Length' and 'Active Diameter' are the next things to consider:
Overall Length is the total length of your Sway Bar, and you need to allow enough room to fit the bushings which are 1/4” (6.35mm) wide, and the arms which are 1.25” (31.75mm) wide. Don’t forget you need two of each.
Active Length is the working length of your bar and dictates the force the bar will deliver. This is calculated by overall length of bar, minus the spline length and bush seating area.
Active Diameter is the diameter of the Active Length and together they give you the power of the bar.
EG: The shorter the bar, the more powerful it will become. However, the shorter the bar, the less flex it will have.
Method One: The Caliper Method
By far the most preferred and accurate method is to use a digital caliper. You can find it on Amazon because it’s capable of showing fractions.
Method Two: The Free Print-Out Tool Method
Print out a free Sway Bar measuring tool. All of the calculations have already been done. Make sure that there is NO SCALING when you print out the tool. Otherwise, the measurements will be off. Once you print out the tool, take a pair of scissors and cut out the tool. Wrap the tool around the bar and match the starting line with the size line. The measurement on the right of the line will be your sway bar size.
Method Three: The Full Set of Wrenches Method
Grab a set of wrenches and see which one fits snugly over the sway bar. If the fit is too loose or doesn’t fit all the way over it’s not the right size. If the wrench fits the sway bar perfectly, then take a look at the size of the wrench - that’s your sway bar diameter!
Method Four: The Crescent Wrench Method
Grab a crescent wrench and tighten it over the bar. Then grab a ruler or tape measure and measure the distance between the jaws. That measurement is the diameter of your sway bar.
Method Five: The Tape Method
Take a roll of tape, and wrap it all the way around the bar one time. Use a razor blade to cut the tape so that the ends match perfectly and pull the tape off the bar. Use a ruler to measure the tape. DO NOT STOP HERE! To get the diameter of your sway bar, take your circumference and divide it by π (that’s pi or 3.14159). The result of this calculation is the diameter of your bar.
Method Six: The Sewing Tape Method
Maybe you’re just not the kind of guy who has his own tools. If that’s the case, even your Grandma will have the tools necessary to measure a sway bar diameter. If you can raid her sewing closet and come away with a cloth measuring tape, you’ve got what you need. Wrap the cloth measuring tape around the outside of the sway bar to find the circumference of the bar and then, you guessed it, divide by pi.
Aftermarket Sway Bars
The right sway bar for your vehicle depends on how you drive and where you drive. Are you a full-time racer? Then aftermarket sway bars can be an ideal choice. Though the aftermarket sway bars are stiffer, they can improve the performance and the handling characteristics of the vehicle.
Stiffness
When going around turns, the outer wheels have a tendency to lift up due to various forces. A stiffer sway bar can help in such situations by lowering the outer end and leveling the vehicle which will increase traction at the wheels making you corner faster and with more confidence. The stiffness is measured with regard to factory sway bars stiffness. So a stiffer sway bar for a particular vehicle will carry a 50% or 100% stiffer stock sway bar distinction on it. Use this percentage to decide how much stiffer you want your sway bars and consequently how much sturdier you expect your suspension to handle during cornering.
Types Of Bushings To Consider
There are different types of bushings available and each has their own characteristics. Rubber bushings are affordable and maintenance-free, yet they will stretch under extreme-stress. Polyurethane bushings can be the best options as they are long lasting. Though they are a bit expensive, when compared to others, they are value for money as they last much longer and provide a good balance of comfort and performance.

Wear and Tear. Tens of thousands of miles of driving with the small ball and socket at either end moving constantly inevitably wears down. The socket becomes loose and there’s excessive movement, and the link can actually come apart. In some instances, the boot can crack or tear, letting sand and dirt into the joint and the grease to escape, and it causes damage quickly. Symptoms usually show up before it separates, although it can break without regular inspection and lubrication. In certain types of links, the bushings on either end can squish or crack, creating excessive play.
Road Damage. Driving over rough surfaces or speed bumps, or impact with a curb or another object on the road, can stress the stabilizer link. It’s possible for the ball to separate from the socket from a hard impact or for the rod to break or a weld to fail. On banana-style links, the rubber bushings can tear or the studs can break.
Overloading. Filling a vehicle with more cargo than it’s rated to carry or towing a trailer that exceeds the vehicle’s rating places undue stress on stabilizer links. Especially when cornering, more weight transitions to the outside wheel and the stabilizer link is expected to bear an excessive weight load. Stabilizer links can separate, bend, or snap.
Corrosion. Positioned at the wheels and constantly exposed to harsh conditions and road materials, stabilizer links can rust or corrode over time. The corrosion weakens the structure’s strength, inviting damage or breakage.
How to Fix a Broken Sway Bar Link?
- New sway bar links
- Sway bar nuts and lock nuts
- Torque wrench
- 8 mm wrench
- Allen wrench
- Impact wrench
- Pliers
- Penetrating oil (not lubricating fluid)

The Steps

- Park your car on level ground.
- Remove the wheels on the end of the vehicle where you’re working.
- Detach the link from the sway bar and shock absorber.
- For links with a hole in the stud, insert the correct-size Allen key into the hole and use a wrench to loosen and remove the nuts that hold the stud binding the link to the suspension system. Do this to both ends of the link.
- With the nuts out, remove the old sway bar links.
- Install new links with the exact dimensions as the old ones. Using wrong-sized links impacts drivability.
- For vehicles with studs, use the Allen wrench to hold down the stud while reinstalling the new lock nuts with a wrench. With the lock nuts in place, install the nuts by tightening with your fingers until the nuts touch the lock nuts. Then, use a torque wrench to tighten them to your manufacturer’s torque specification.
- Reinstall your tires and lower your vehicle.
Our Factory
As a modern enterprise, YZS has a complete R&D, production, sales, and service system as well as a strong technical and management team. Our products have a complete range, excellent quality and reasonable prices. Products are widely used in North American, European markets and other markets to meet OEM needs and performance requirements. Our fast delivery and excellent quality have won high trust and appreciation from our customers.


Our Certificates
We have IATF16949:2016 certificate and multiple product patent certificates. We have strict management and control from raw materials to finished products, and the products we manufacture can meet customer requirements. YZS products are widely sold all over the world, and it has established good business relationships with giants in the global automotive market over the years.


Common Problems of Sway Bar
Q: What happens when sway bar is bad?
Q: Can I drive with a broken sway bar?
Q: Do you really need a sway bar?
Q: Why do people remove sway bars?
Q: Does sway bar affect ride quality?
Q: Is a sway bar hard to fix?
Q: How do I know if my sway bar is broken?
Q: How long can you drive with a bad sway bar?
Q: Do all cars have sway bars?
Q: How many sway bars are there in a car?
Q: Do sway bars make a big difference?
Q: Do sway bars help at high speeds?
Q: Can sway bar mess up alignment?
Q: Are sway bars bad for drifting?
Q: What does a bad sway bar feel like?
Q: When should I replace my sway bar?
Q: Can you replace a sway bar by yourself?
Q: Can you replace one sway bar?
Q: Do you need an alignment after replacing sway bar links?
Q: Where is sway bar located?